Forms
What's New
The new Forms module offers a fantastically intuitive new interface as well as some helpful improvements to help you engage your community. Here's what's new:
- Drag-and-drop arrangement of form fields and multiple-choice options
- Dedicated field types for collecting common information: Date, Phone Number, Address.
- The new Group feature that keeps your form sections organized and allows you to duplicate groups of form elements with one click.
- Changes are saved only when you're ready with your form, instead of being saved after editing each element.
- Data from deleted elements is now backed up for you in the Submissions view.
- Improved spam protection helping to keep you safe from phony submissions (and the best part... no captcha is needed)!
Overview
Here's the quick version of how to add a form to your site.
1. In Ekklesia 360, go to Connect > Forms > Add a New Form.
2. Under Form Settings, give your form a Name and enter an email address (or several) in Notify. Whenever a form is submitted, these email addresses get a copy.
3. Choose a form Type:
Display form on website: This form can be added to any Page or Navigation link. Under this option, choose a Result Page which submitters will be taken to after completing the form. Then, choose a Template or simply leave the default template in place.
Display form during event RSVP: This form is attached to the Event RSVP process when a visitor is registering for an event on an Event page. Use this to collect additional information about your event guests. With Request information for under this option, decide if you'd like the form to be filled out multiple times according to the number of guests.
Display form during product purchase: This form is attached to a product purchase process. Use this to collect some additional information about the customers who purchase a certain product.
Click Save to continue to the Form Builder.
5. In the Form Builder, click and drag any Form Element (Name, Email, Date) onto the right side of the screen. Each element is designed for specific data types; for example, Phone contains three fields for a correctly formatted U.S. phone number.
6. For a one-line response, use Text Field; for longer responses, use Text Area. To collect a single option from multiple choices, use Radio button or Dropdown. To allow any number of choices to be selected, use Checkboxes.
7. You can group form elements together with the Group tool. With a Group created, drag other form elements inside it to be collected into one. A Group can then be duplicated to copy the same set of form elements multiple times (handy when collecting the same information for multiple people in one form).
8. When done, Save your changes on the form.
9. Click Preview Form to see how things are looking, or publish your form to the site.
10. There are two ways to publish your form:
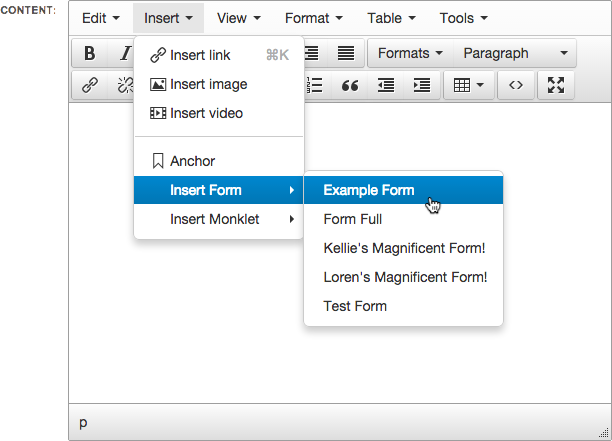
1. While creating a Page, Blog Post, or Article etc, in the Content box, go to Insert > Insert Form > [Form Name].
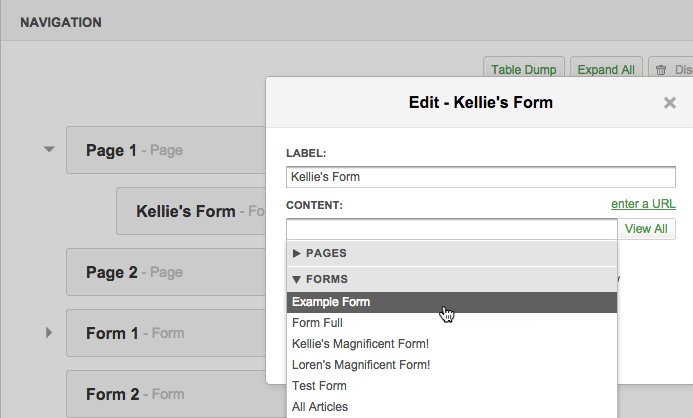
2. Go to Content > Pages > Navigation, add a new Navigation Item. When creating a new Navigation item, click View All at the Content field and you'll see a list of your forms able to able to be added to the site as a navigation item.
Workbench
Drag and drop a Form Element from the left hand side to the right to begin building your form.
|
|
Name |
|
|
Email |
|
|
Phone |
|
|
Address |
|
|
Date |
|
|
Group |
|
|
Text Field |
|
|
Text Area |
|
|
Radio Buttons |
|
|
Checkboxes |
|
|
Dropdown |
|
|
File Upload |
Preview
The right-hand side of the Form Builder includes a preview of how your form is arranged. Click and drag any of your elements to arrange their order.
When hovering over a form element, click the "edit" pencil to edit the element. As you work on that element, your changes are shown in a focused preview in the popup window.
When done, click Save Changes at the top of the preview to push your changes live.
Publish
There are several ways to publishing your Form on your site.
Using an existing Page
If you'd like to instead create a Page which includes other content as well as your form, you may want to Insert a form on an existing page. To do this, go to Content > Pages > [Your Page]. In the Content box, go to Insert > Insert Form > [Form Name]. Your form's Display code will be placed at the cursor's location on your page—this is where the form will be output on your site.
Add to Navigation
To display a form anywhere on your site, simply visit to Content > Pages > Navigation. When creating new Navigation Item and selecting the Content of the item, select your form via the Forms menu. That's it! Your form will be accessible from that location on your site.
Events and Products
If your form is an Event type form or a Product type form, the secure RSVP or purchase transaction windows will include your form automatically.
No matter how you choose to publish, any future changes made in the Forms module will automatically be reflected on your live form.
Pro Tips
- Use a Group to contain a set of form elements and duplicate the group to quickly build a longer form with similar fields.
- Add multiple-choice options (Dropdowns, Checkboxes, Radio buttons) faster by hitting the N key after saving the previous item.
- When using the Preview option, copy the URL from your browser's address bar and share it with colleagues to get a fresh perspective on your form.
- To collect Phone and Address data in formats used outside the U.S., use Text Fields to ensure international users are not limited U.S. formats.
- For additional help with form layout and styling, contact Support.
Forms and security
Form submissions are sent over an SSL encrypted connection.