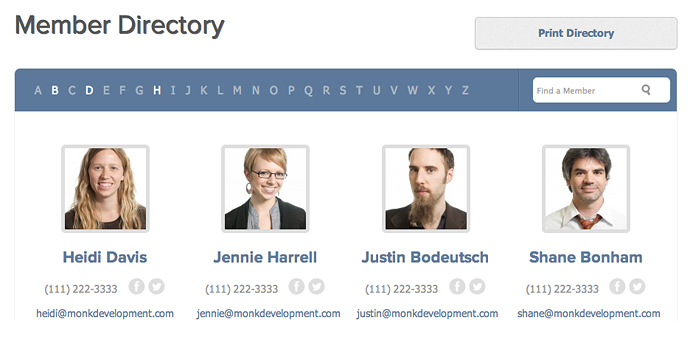
Layout: Member Directory

The Member Directory is a custom layout powered by the People module in Ekklesia 360, gathering Member accounts to populate the listings. This is a step-by-step guide to set up and manage a member directory with the layout. In this guide, we assume that Site Administrator(s) will be populating Member accounts with each person's profile information, and that individual members don't need the ability to log in and update their profile themselves.
Adding the layout to your site
After the Member Directory template is added to your site by a developer, a Page (Content > Pages) should be created and Published with the Member Directory layout selected (a Page may already be created for you). After this Page is created, it can be placed in your Navigation (Content > Pages > Navigation) to be accessible on the live site.
Privacy
It is not unlawful to post member information online, however it is not recommended to post without permission. If you'd like your directory to be private, specify this when purchasing the layout and our team will be sure to apply appropriate privacy settings when integrating the layout into your site. If you would later like to change this preference, a developer can do this for you as well.
Adding member listings
Site "Members" are accounts for people whose information is stored either for database purposes or to potentially be given access into the system. Here, we're adding them for the former purpose. To get started adding Members, go to People > Members. You'll notice all of the members of your site in this tab.
Email addresses
Any new Member account will need a valid, unique email address. For some email systems, it may be possible to use the same email address for all members who do not need access into the system.
For a quick solution, this is sometimes possible using the plus "+" symbol in your email address and adding a unique word. For example: , , etc. These email addresses point to the same account, To see if this is possible for your email system, send an email to [your name]+[test]@[your domain].com. If you receive the email, your system supports plus "+" codes, and you can use this technique for each member.
If your email system does not support plus "+" email addresses, each member will need their email address added.
Knowing this about member email addresses, see Adding Members on how to add each member account.
Adding a member profile
When the member account is created, the photo, position title, and description etc. can be added in the Profile tab of the Member record. On the website, the following information about each member is displayed by default:
- Full name
- Work phone
- Email address
- Facebook page
- Twitter page
- Profile photo
If you prefer to add or hide any of these fields from the live website (such as phone number, etc), please contact us.
Several custom fields can also be added in case you wish to enter data into a field which currently isn't available in the Profile.
After members have profile information (their Name and a photo, at very least), they can begin to be arranged into Groups for display in the directory.
Displaying Member listings
Arranging Members into Groups
Multiple groups of Members are able to be displayed in the directory. Therefore, you can create several Groups of members (ie: "Leadership", "Communications", etc), or add all members into one Group (ie: Directory). Any Group(s) used for the members will then be added to a Group Series which will be used in the Member Directory.
- Go to PEOPLE > GROUPS.
- Select or create a Group that you would like to contain the directory members.
- Select "Edit Group".
- Assign the "Directory Groups" Series to this Group. This Group Series will be pulled in by the Member Directory.
- Click "Update Group".
At this point, the members in this Group Series will be displaying on the site.
Arranging the Group Series
If you would like to change the order in which the Groups display on your Member Directory:
- Go to PEOPLE > GROUPS.
- Select the "Series" tab.
- Select the "Directory Groups" series.
- Reorder the list of groups that are included in this series.
- Click Save.
