Using the WYSIWYG editor

Overview
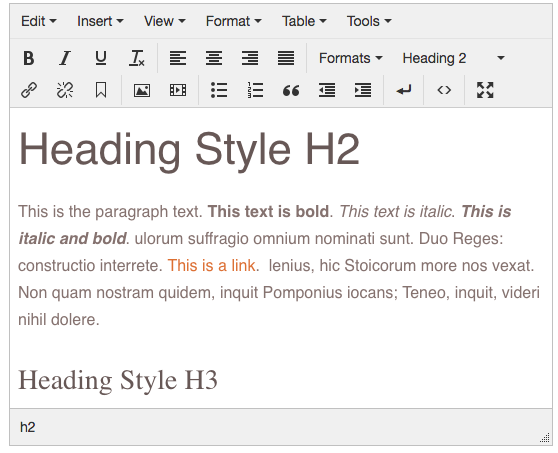
Content is added using a WYSIWYG editor ("What You See Is What You Get"). Each of the buttons are explained below.
Menu Items
- Edit: Used to cut, copy, paste, paste (plain) text, undo, redo, or select all
- Insert: Can be used to insert images, video, links, anchors, horizontal lines, single space lines, forms, and monklets (Options can vary based on the Theme)
- Forms: Insert the form you create in the CONNECT tab
- Monklets: Insert snippets of code such as the Staff Monklet
- View: Visual Aids, Fullscreen, and Blocks (Options can vary based on the theme)
- Format: Various text and element formatting
- Table: Insert and edit tables
- Tools: Source Code, Wrap selection in <div> tag
First Row of Icons
- B: bold text
- I: itlaicize text
- U: underline text
- Tx: clear formatting
- Align: left, align center, align right, justify
- Formats dropdown: Select various text formatting options including custom classes and styles added to your site (Options can vary based on the Theme)
- Headings: H1-H6
- Inline: Choose formats for your text
- Blocks: Choose between div, paragraph, blockquote
- Alignment: Left, Center, Right, Justify
- Buttons: Small, Medium, Large
- Div-Callout: Call attention to special text
- Responsive Image: Make an image on your page change size based on screen size
- Paragraph: Select various headings for your site on a block level. (Options can vary based on the Theme)
When typing in content, use the Enter key to begin a new paragraph. To start a new line and not begin a new paragraph, use single line space or Shift-Enter to tab one line instead of a paragraph return.
Second Row of Icons
- Chain: Hyperlink (reference media files, other pages or link to an external website)
- Url: Enter the address of the link or select the file/search icon to select a media item or document from within Ekklesia 360.
- Test to Display: Enter the text of the link you would like to display.
- Link List: Select a page, article, sermon, blog, or event from within Ekklesia 360 you would like to link to.
- Target: If you want the link to go to an external website you want to keep your website open, therefore, make sure it is "Open in a new window".
- Broken Chain: removes the link that is currently selected in the editor
- Bookmark: When you have a page with a lot of text and you want people to be able to skip down to a particular area, use an anchor.
- For example, let's say a page called "About Us" has large amounts of text. You want to be able to jump down to a section that explains your history. Highlight the text you want to jump down to and select the anchor icon. Name the anchor something simple. Note that this is case sensitive and avoid using spaces or special characters. Remember what you name this anchor. For this example, let's name the anchor "history".
- Go to the text that will send the user to the history section and select the link icon. In the URL field, paste in the URL for page that the contains the section you want to jump to. Type in "#" and then the anchor name as you wrote it in the first step. (Ex: http://your-domain.org/about-us/#history).
- Photo: Choose from pictures you've already uploaded and insert them into Ekklesia 360.
- It's possible to utilize an external URL to an image (though you may not have control over whether the image remains at that location).
- Advanced Tab - Add margins around the image with Horizontal and Vertical Space, or add inline CSS in the Styles field.
- Filmstrip: Insert or edit embedded movies
- Bulleted List: Used to insert a bulleted list.
- Numbered List: Used to insert a numbered list.
- Quotes: Used to toggle selected text as a blockquote.
- Indent left / right: Visually indents text left or right.
- Enter Icon: Use to insert a single line space.
- Source Code "<>": Code editor for access to the raw HTML code of the page.
- Toggle Full Screen Mode: changes editor to full screen mode.
For information on your Theme's specific options, view your Theme's Setup Guide here: Theme Setup Guides
